Жизнь веб-разработчика омрачена сложностями. Особенно неприятно, когда источник этих сложностей неизвестен. То ли это проблема с отправкой запроса, то ли с ответом, то ли со сторонней библиотекой, то ли внешний API глючит? Существует куча различных прилад, способных упростить нам жизнь. Вот некоторые инструменты командной строки, которые лично я считаю бесценными.
cURL
cURL - программа для передачи данных по различным протоколам, похожая на wget. Основное отличие в том, что по умолчанию wget сохраняет в файл, а cURL выводит в командную строку. Так можно очень просто посмотреть контент веб-сайта. Например, вот как быстро получить свой текущий внешний IP:
$ curl ifconfig.me
93.96.141.93
Параметры -i
(показывать заголовки) и -I
(показывать только заголовки) делают cURL отличным инструментом для дебаггинга HTTP-ответов и анализа того, что конкретно сервер вам отправляет:
$ curl -I сайт
HTTP/1.1 200 OK
Server: nginx
Date: Thu, 18 Aug 2011 14:15:36 GMT
Content-Type: text/html; charset=utf-8
Connection: keep-alive
Keep-alive: timeout=25
Параметр -L
тоже полезный, он заставляет cURL автоматически следовать по редиректам. cURL поддерживает HTTP-аутентификацию, cookies, туннелирование через HTTP-прокси, ручные настройки в заголовках и многое, многое другое.
Siege
- инструмент для нагрузочного тестирования. Плюс, у него есть удобная опция -g
, которая очень похожа на curl –iL
, но вдобавок показывает вам ещё и заголовки http-запроса. Вот пример с google.com (некоторые заголовки удалены для краткости):
$ siege -g www.google.com
GET / HTTP/1.1
Host: www.google.com
User-Agent: JoeDog/1.00 (X11; I; Siege 2.70)
Connection: close
HTTP/1.1 302 Found
Location: http://www.google.co.uk/
Content-Type: text/html; charset=UTF-8
Server: gws
Content-Length: 221
Connection: close
GET / HTTP/1.1
Host: www.google.co.uk
User-Agent: JoeDog/1.00 (X11; I; Siege 2.70)
Connection: close
HTTP/1.1 200 OK
Content-Type: text/html; charset=ISO-8859-1
X-XSS-Protection: 1; mode=block
Connection: close
Но для чего Siege действительно великолепно подходит, так это для нагрузочного тестирования. Как и апачевский бенчмарк ab
, он может отправить множество параллельных запросов к сайту и посмотреть, как он справляется с трафиком. В следующем примере показано, как мы тестируем Google с помощью 20 запросов в течение 30 секунд, после чего выводится результат:
$ siege -c20 www.google.co.uk -b -t30s
...
Lifting the server siege... done.
Transactions: 1400 hits
Availability: 100.00 %
Elapsed time: 29.22 secs
Data transferred: 13.32 MB
Response time: 0.41 secs
Transaction rate: 47.91 trans/sec
Throughput: 0.46 MB/sec
Concurrency: 19.53
Successful transactions: 1400
Failed transactions: 0
Longest transaction: 4.08
Shortest transaction: 0.08
Одна из самых полезных функций Siege - то, что он может работать не только с одним адресом, но и со списком URL’ов из файла. Это отлично подходит для нагрузочного тестирования, потому что можно моделировать реальный трафик на сайте, а не просто жать один и тот же URL снова и снова. Например, вот как использовать Siege, чтобы нагрузить сервер, используя адреса из вашего лога Apache:
$ cut -d " " -f7 /var/log/apache2/access.log > urls.txt
$ siege -c
Ngrep
Для серьёзного анализа трафика существует Wireshark с тысячами настроек, фильтров и конфигураций. Есть также версия для командной строки tshark
. Но для простых задач функционал Wireshark я считаю избыточным. Так что до тех пор, пока мне не нужно мощное оружие, я использую . Он позволяет делать с сетевыми пакетами то же самое, что grep
делает с файлами.
Для веб-трафика вы почти всегда захотите использовать параметр -W , чтобы сохранить форматирование строк, а также параметр -q , который скрывает избыточную информацию о неподходящих пакетах. Вот пример команды, которая перехватывает все пакеты с командой GET или POST:
Ngrep -q -W byline "^(GET|POST) .*"
Вы можете добавить дополнительный фильтр для пакетов, например, по заданному хосту, IP-адресу или порту. Вот фильтр для всего входящего и исходящего трафика на google.com, порт 80, который содержит слово “search”.
Ngrep -q -W byline "search" host www.google.com and port 80
Представляем вашему вниманию новый курс от команды The Codeby - "Тестирование Веб-Приложений на проникновение с нуля". Общая теория, подготовка рабочего окружения, пассивный фаззинг и фингерпринт, Активный фаззинг, Уязвимости, Пост-эксплуатация, Инструментальные средства, Social Engeneering и многое другое.
Для чего нужна cURL
- cURL отлично подходит для имитации действий пользователя в браузере.
Реальный практический пример: вам нужно перезагрузить роутер (модем) для смены IP адреса. Для этого нужно: авторизоваться в роутере, перейти к странице обслуживания и нажать кнопку «Перезагрузка». Если это действие нужно выполнить несколько раз, то процедуру нужно повторить. Согласитесь, делать каждый раз в ручную эту рутину не хочется. cURL позволяет автоматизировать всё это. Буквально несколькими командами cURL можно добиться авторизации и выполнения задания на роутере.
- cURL удобен для получения данных с веб-сайтов в командной строке.
Ещё один практический пример: мы хотим реализовать показ общей статистики для нескольких сайтов. Если использовать cURL, то это становится вполне тривиальной задачей: с помощью cURL мы проходим аутентификацию на сервисе сбора статистики (если это требуется), затем (опять же командами cURL) получаем необходимые страницы, парсим нужные нам данные; процедура повторяется для всех наших сайтов, затем мы складываем и выводим конечный результат.
Т.е. случаи использования cURL вполне реальные, хотя, в большинстве, cURL нужна программистам, которые используют её для своих программ.
cURL поддерживает множество протоколов и способов авторизации, умеет передавать файлы, правильно работает с кукиз, поддерживает SSL сертификаты, прокси и очень многое другое.
cURL в PHP и командной строке
Мы можем использовать cURL двумя основными способами: в скриптах PHP и в командной строке.
Чтобы включить cURL в PHP на сервере, необходимо в файле php.ini раскоментировать строку
Extension=php_curl.dll
А затем перезагрузить сервер.
На Linux необходимо установить пакет curl.
На Debian, Ubuntu или Linux Mint:
$ sudo apt-get install curl
На Fedora, CentOS или RHEL:
$ sudo yum install curl
Чтобы наглядно было видно разницу в использовании в PHP и в командной строке, будем одни и те же задачи выполнять дважды: сначала в скрипте PHP, а затем в командной строке. Постараемся при этом не запутаться.
Получение данных при помощи cURL
Получение данных при помощи cURL в PHP
Пример на PHP:
Всё очень просто:
$target_url — адрес сайта, который нас интересует. После адреса сайта можно поставить двоеточие и добавить адрес порта (если порт отличается от стандартного).
curl_init — инициализирует новый сеанс и возвращает дискриптор, который в нашем примере присваивается переменной $ch .
Затем мы выполняем запрос cURL функцией curl_exec , которой в качестве параметра передаётся дискриптор.
Всё очень логично, но при выполнении этого скрипта, на нашей странице отобразиться содержимое сайта. А что если мы не хотим отображать содержимое, а хотим записать его в переменную (для последующей обработки или парсинга).
Чуть дополним наш скрипт:
0) { echo "Ошибка curl: " . curl_error($ch); } curl_close($ch); ?>
У нас появилась строчка curl_setopt($ch, CURLOPT_RETURNTRANSFER, 1); .
curl_setopt — задаёт опции. Полный список опций можно найти на этой странице: http://php.net/manual/ru/function.curl-setopt.php
$response_data = curl_exec($ch);
Теперь значение скрипта присваивается переменной $response_data, с которой можно проводить дальнейшие операции. Например, можно вывести её содержимое.
If (curl_errno($ch) > 0) { echo "Ошибка curl: " . curl_error($ch); }
служат для отладки, на случай возникновения ошибок.
Получение данных при помощи cURL в командной строке
В командной строке достаточно набрать
Curl mi-al.ru
где вместо mi-al.ru — адрес вашего сайта.
Если нужно скопировать данные в переменную, а не выводить полученный результат на экран, то делаем так:
Temp=`curl mi-al.ru`
При этом всё равно выводятся некие данные:
Чтобы они не выводились, добавляем ключ -s :
Temp=`curl -s mi-al.ru`
Можно посмотреть, что записалось:
Echo $temp | less
Базовая аутентификация и аутентификация HTTP
Аутентификация, проще говоря, это введение имени пользователя и пароля.
Базовая аутентификация — это аутентификация средствами сервера. Для этого создаются два файла: .htaccess и .htpasswd
Содержимое файла.htaccess примерно такое
AuthName "Только для зарегистрированных пользователей!" AuthType Basic require valid-user AuthUserFile /home/freeforum.biz/htdocs/.htpassw
Содержимое файла.htpasswd примерно такое:
Mial:CRdiI.ZrZQRRc
Т.е. логин и хэш пароля.
При попытке получить доступ к запароленной папке, в браузере отобразиться примерно такое окно:

HTTP аутентификация — это тот случай, когда мы вводим логин и пароль в форму на сайте. Именно такая аутентификация используется при входе в почту, на форумы и т. д.

Базовая аутентификация cURL (PHP)
Есть сайт http://62.113.208.29/Update_FED_DAYS/, который требует от нас авторизоваться:
Пробуем наш первоначальный скрипт:
0) { echo "Ошибка curl: " . curl_error($ch); } else { echo $response_data; } curl_close($ch); ?>
Хотя скрипт и считает, что ошибки нет, но выводимый результат нам совсем не нравится:
Добавляем две строки:
Curl_setopt($ch, CURLOPT_HTTPAUTH, CURLAUTH_BASIC); curl_setopt($ch, CURLOPT_USERPWD, "ru-board:ru-board");
Первой строкой мы задаём тип аутентификации — базовая. Вторая строка содержит имя и пароль через двоеточие (в нашем случае имя и пароль одинаковые — ru-board). Получилось так:
0) { echo "Ошибка curl: " . curl_error($ch); } else { echo $response_data; } curl_close($ch); ?>

Базовая аутентификация cURL (в командной строке)
Этого же самого в командной строке можно добиться одной строчкой:
Curl -u ru-board:ru-board http://62.113.208.29/Update_FED_DAYS/
Я не забыл указать тип аутентификации, просто в cURL базовый тип аутентификации является дефолтным.
В командной строке всё получилось так быстро, что от расстройства я написал вот такую программу. Она подключается к сайту и скачивает самое последнее обновление:
Temp=`curl -s -u ru-board:ru-board http://62.113.208.29/Update_FED_DAYS/ | grep -E -o "Update_FED_201{1}.{2}.{2}.7z" | uniq | tail -n 1`; curl -o $temp -u ru-board:ru-board http://62.113.208.29/Update_FED_DAYS/$temp
Буквально ещё несколькими командами можно добавить:
- распаковку архива в указанный каталог;
- запуск обновлений КонсультантПлюс (это обновления для него);
- можно реализовать проверку — было ли уже скачено последнее доступное обновление или появилось новое;
- добавить это всё в Cron для ежедневных обновлений.
HTTP аутентификация cURL
HTTP аутентификация cURL в PHP
Нам нужно знать:
- адрес, куда отправлять данные для аутентификации
- метод отправки GET или POST
- логин
- пароль
Иногда этих данных оказывается недостаточно. Давайте разберёмся.
Адрес, куда нужно отправить данные, можно взять из формы аутентификации. Например:
Если вы откроете этот код в вашем браузере, вы увидите форму с текстовым полем и кнопку с надписью "OK". Если вы введете "1905" и нажмете OK, браузер создаст новый URL, по которому и проследует. URL будет представляться строкой, состоящей из пути предыдущего URL и строки, подобной "junk.cgi?birthyear=1905&press=OK".
Например, если форма располагалась по адресу "www.hotmail.com/when/birth.html", то при нажатии на кнопку OK вы попадете на URL "www.hotmail.com/when/junk.cgi?birthyear=1905&press=OK".
Большинство поисковых систем работают таким образом.
Чтобы curl сформировал GET-запрос, просто введите то, что ожидалось от формы:
# curl "www.hotmail.com/when/junk.cgi?birthyear=1905&press=OK"
4.2 POST
Метод GET приводит к тому, что вся введенная информация отображается в адресной строке вашего браузера. Может быть это хорошо, когда вам нужно добавить страницу в закладки, но это очевидный недостаток, когда вы вводите в поля формы секретную информацию, либо когда объем информации, вводимый в поля, слишком велик (что приводит к нечитаемому URL).
Протокол HTTP предоставляет метод POST. С помощью него клиент отправляет данные отдельно от URL и поэтому вы не увидете их в адресной строке.
Форма, генерирующая POST-запрос, похожа на предыдущую:
Curl может сформировать POST-запрос с теми же данными следующим образом:
# curl -d "birthyear=1905&press=%20OK%20" www.hotmail.com/when/junk.cgi
Этот POST-запрос использует "Content-Type application/x-www-form-urlencoded", это самый широко используемый способ.
Данные, которые вы отправляете к серверу, должны быть правильно закодированы, curl не будет делать это за вас. К примеру, если вы хотите, чтобы данные содержали пробел, вам нужно заменить этот пробел на %20 и т.п. Недостаток внимания к этому вопросу - частая ошибка, из-за чего данные передаются не так, как надо.
В далеком 1995 был определен дополнительный способ передавать данные по HTTP. Он задокументирован в RFC 1867, поэтому этот способ иногда называют RFC1867-posting.
Этот метод в основном разработан для лучшей поддержки загрузки файлов. Форма, которая позволяет пользователю загрузить файл, выглядит на HTML примерно следующим образом:
Заметьте, что тип содержимого Content-Type установлен в multipart/form-data.
Чтобы отослать данные в такую форму с помощью curl, введите команду:
# curl -F upload=@localfilename -F press=OK
4.4 Скрытые поля
Обычный способ для передачи информации о состоянии в HTML-приложениях - использование скрытых полей в формах. Скрытые поля не заполняются, они невидимы для пользователя и передаются так же, как и обычные поля.
Простой пример формы с одним видимым полем, одним скрытым и кнопкой ОК:
Чтобы отправить POST-запрос с помощью curl, вам не нужно думать о том, скрытое поле или нет. Для curl они все одинаковы:
# curl -d "birthyear=1905&press=OK&person=daniel"
4.5 Узнать, как выглядит POST-запрос
Когда вы хотите заполнить форму и отослать данные на сервер с помощью curl, вы наверняка хотите, чтобы POST-запрос выглядел точно также, как и выполненный с помощью браузера.
Простой способ увидеть свой POST-запрос, это сохранить HTML-страницу с формой на диск, изменить метод на GET, и нажать кнопку "Отправить" (вы можете также изменить URL, которому будет передаваться данные).
Вы увидите, что данные присоединились к URL, отделенные символами "?", как и предполагается при использовании GET-форм.
5. PUT
Пожалуй, лучший способ загружать данные на HTTP-сервер, это использовать PUT. Опять же, это требует программы (скрипта) на серверной части, которая знает, что делать и как принимать поток HTTP PUT.
Отослать файл на сервер при помощи curl:
# curl -T uploadfile www.uploadhttp.com/receive.cgi
6. Аутентификация
Аутентификация - передача серверу имени пользователя и пароля, после этого он проверяет, имеете ли вы право выполнить требуемый запрос. Аутентификация по методу Basic (которым curl пользуется по умолчанию) основана на открытом тексте, что означает, что имя пользователя и пароль не будут зашифрованы, а лишь слегка "затуманены" по алгоритму Base64, что оставляет возможность узнать эту информацию злоумышленникам на пути между вами и HTTP-сервером.
Указание curl использовать имя пользователя и пароль:
# curl -u name:password www.secrets.com
Сайт может требовать использования другого метода аутентификации (посмотрите, что пишет сервер в заголовках), в этих случаях можно использовать ключи --ntlm, --digest, --negotiate или даже --anyauth. Иногда доступ к внешним HTTP-серверам происходит через прокси, так часто делают в компаниях и фирмах. HTTP-прокси может требовать свои логин и пароль для доступа к Интернету. Соответствующий ключ curl:
# curl -U proxyuser:proxypassword curl.haxx.se
Если прокси требует аутентификации по методу NTLM, укажите --proxy-ntlm, если метод Digest, то --proxy-digest.
Если вы не укажете пароль в ключах -u и -U, то curl спросит его у вас в интерактивном режиме.
Заметьте, что когда curl работает, строка запуска (а вместе с этим и ключи, и пароли) могут быть видны другим пользователям вашей системы в списке задач. Есть способы предотвратить это. Об этом ниже.
7. Referer
HTTP-запрос может включать поле "referer", которое указывает, с какого URL пользователь пришел на данный ресурс. Некоторые программы/скрипты проверяют поле "referer" и не выполняют запрос, если пользователь пришел с неизвестной страницы. Хотя это и глупый способ проверки, тем не менее многие скрипты используют его. С помощью curl вы можете вписать что угодно в поле "referer" и таким образом заставлять выполнять то, что вам нужно.
Это делается следующим образом:
# curl -e http://curl.haxx.se daniel.haxx.se
8. User Agent
Все HTTP-запросы поддерживают поле "User-Agent", в котором указывается клиентское приложение пользователя. Многие web-приложения используют эту информацию, чтобы тем или иным способом отобразить страницу. Web-программисты создают несколько версий страницы для пользователей разных браузеров в целях улучшения внешнего вида, использования различных скриптов javascript, vbscript и т.д.
Иногда вы можете обнаружить, что curl возвращает страницу не такой, какой вы ее видели в своем браузере. В этом случае как раз уместно использовать поле "User Agent", чтобы в очередной раз обмануть сервер.
Замаскировать curl под Internet Explorer на машине с Windows 2000:
# curl -A "Mozilla/4.0 (compatible; MSIE 5.01; Windows NT 5.0)"
Почему бы не стать Netscape 4.73 на Linux-машине (PIII):
# curl -A "Mozilla/4.73 (X11; U; Linux 2.2.15 i686)"
9. Перенаправления (redirects)
Отвечая на ваш запрос, сервер вместо самой страницы может вернуть указание, куда браузер должен пойти дальше, чтобы попасть на нужную страницу. Заголовок, который указывает браузеру такое перенаправление - это "Location:".
По умолчанию curl не идет по адресу, указанному в "Location:", а просто показывает страницу как обычно. Но можно его направить следующим образом:
# curl -L www.sitethatredirects.com
Если вы используете curl для POST-запросов на сайт, который сразу же перенаправляет на другую страницу, вы можете смело использовать связку -L и -d/-F. Curl сформирует POST-запрос для первой страницы, а затем GET-запрос для последующей.
10. Cookies
С помощью cookies веб-браузеры контролируют состояние на стороне клиента. Cookie - это имя с присоединенным содержимым. Сервер при помощи отправки cookies сообщает клиенту путь и имя хоста, по которому в следующий раз должны быть отправлены cookies, сообщает время жизни cookies и некоторые другие параметры.
Когда клиент соединяется с сервером по адресу, указанному в принятом cookie, клиент посылает этот cookie к серверу (если время жизни не истекло).
Многие приложения и сервера используют этот метод, чтобы объединить нескольких запросов в одну логическую сессию. Чтобы curl также мог выполнять такую функцию, мы должны уметь сохранять и отправлять cookies, как и делают браузеры.
Простейший способ отправить cookie к серверу при получении страницы с помощью curl, это добавить соответствующий ключ в командной строке:
# curl -b "name=Daniel" www.cookiesite.com
Cookies отправляются как обычные HTTP-заголовки. Это позволяет curl сохранять cookies, сохраняя заголовки. Сохранение cookies с помощью curl выполняется командой:
# curl -D headers_and_cookies www.cookiesite.com
(кстати, для сохранения cookies лучше использовать ключ -c, об этом ниже).
У curl имеется полнофункциональный обработчик cookies, который полезен, когда вы хотите соединиться в очередной раз к серверу и использовать cookies, сохраненные в прошлый раз (либо подработанные вручную). Для использования cookies, сохраненных в файле, вызовите curl так:
# curl -b stored_cookies_in_file www.cookiesite.com
"Cookie-движок" curl включается, когда вы указываете ключ -b. Если вы хотите, чтобы curl лишь воспринимал cookies, используйте -b с указанием файла, которого не существует. Например, если вы хотите, чтобы curl принял cookies со страницы, а затем пошел по перенаправлению (возможно, отдав принятый только что cookie), то можно вызывать curl так:
# curl -b nada -L www.cookiesite.com
Curl умеет читать и писать cookie-файлы, имеющие формат Netscape и Mozilla. Это удобный способ обмениваться cookies между браузерами и автоматическими скриптами. Ключ -b автоматически определяет, является ли данный файл cookie-файлом указанных браузеров и обрабатывает его соответствующим образом, а используя ключ -c/--cookie-jar, вы можете заставить curl записать новый cookie-файл по завершении операции:
# curl -b cookies.txt -c newcookies.txt www.cookiesite.com
11. HTTPS
Есть несколько способов обезопасить ваши HTTP-передачи. Наиболее известным протоколом, решающим эту задачу, является HTTPS, или HTTP over SSL. SSL зашифровывает все посылаемые и принимаемые по сети данные, что увеличивает вероятность того, что ваша информация останется в тайне.
Curl поддерживает запросы к HTTPS-серверам благодаря свободно распространяемой библиотеке OpenSSL. Запросы происходят обычным способом:
# curl https://that.secure.server.com
11.1 Сертификаты
В мире HTTPS для аутентификации в дополнение к имени пользовавателя и паролю вы используете сертификаты. Curl поддерживает сертификаты на стороне клиента. Все сертификаты заперты ключевой фразой, которую вам нужно ввести прежде чем curl может начать с ними работу. Ключевая фраза может быть указана либо в командной строке, либо введена в интерактивном режиме. Сертификаты в curl используются следующим образом:
# curl -E mycert.pem https://that.secure.server.com
Curl также проверяет сервер на подлинность, сверяя сертификат сервера с локально хранящимся. Обнаружившееся несоответствие приведет к тому, что curl откажется соединяться. Для игнорирования проверки на подлинность используйте ключ -k.
Более подробная информация о сертификатах может быть найдена на странице http://curl.haxx.se/docs/sslcerts.html.
12. Произвольные заголовки запроса
Возможно, вам понадобится изменять или добавлять элементы отдельных запросов curl.
К примеру, вы можете изменить запрос POST на PROPFIND и отправить данные как "Content-Type: text/xml" (вместо обычного Content-Type):
# curl -d "
Вы можете удалить какой-нибудь заголовок, указав его без содержимого. Например, вы можете удалить заголовок "Host:", тем самым сделав запрос "пустым":
# curl -H "Host:" http://mysite.com
Также вы можете добавлять заголовки. Возможно, вашему серверу потребуется заголовок "Destination:":
# curl -H "Destination: http://moo.com/nowhere" http://url.com
13. Отладка
Часто бывает так, что сайт реагирует на запросы curl не так, как на запросы браузера. В этом случае нужно максимально уподобить curl браузеру:
- Используйте ключ --trace-ascii для сохранения подробного отчета запросов, чтобы затем подробно изучить их и разобраться в проблеме.
- Убедитесь, что вы проверяете на cookies и используете их при необходимости (ключ чтения -b и сохранения -c)
- Укажите в поле "user-agent" один из последних популярных браузеров
- Заполните поле "referer" как это делает браузер
- Если вы используете POST-запросы, убедитесь, что все поля передаются в том же порядке, что и браузер (см. выше, пункт 4.5)
Хороший помощник в этом нелегком деле - плагин для Mozilla/Firefox LiveHTTPHeader, который позволяет просматривать все заголовки, которые отправляет и принимает этот браузер (даже при использовании HTTPS).
Более низкоуровневый подход - захват HTTP-траффика в сети с помощью программ, таких как ethereal или tcpdump, с последующим анализом, какие заголовки были получены и отправлены браузером (HTTPS делает этот подход неэффективным).
RFC 2616 обязательно для чтения всем, кто хочет понять протокол HTTP.
RFC 2396 объясняет синтаксис URL.
RFC 2109 определяет работу cookies.
RFC 1867 определяет формат File Upload Post.
http://openssl.planetmirror.com - домашняя страница проекта OpenSSL
http://curl.haxx.se - домашняя страница проекта cURL
curl (1)NAME
curl - transfer a URLSYNOPSIS
curlDESCRIPTION
curl is a tool to transfer data from or to a server, using one of the supported protocols (HTTP, HTTPS, FTP, FTPS, TFTP, DICT, TELNET, LDAP or FILE). The command is designed to work without user interaction.curl offers a busload of useful tricks like proxy support, user authentication, ftp upload, HTTP post, SSL (https:) connections, cookies, file transfer resume and more. As you will see below, the amount of features will make your head spin!
curl is powered by libcurl for all transfer-related features. See (3) for details.
URL
The URL syntax is protocol dependent. You"ll find a detailed description in RFC 3986.You can specify multiple URLs or parts of URLs by writing part sets within braces as in:
or you can get sequences of alphanumeric series by using as in:
No nesting of the sequences is supported at the moment, but you can use several ones next to each other:
You can specify any amount of URLs on the command line. They will be fetched in a sequential manner in the specified order.
Since curl 7.15.1 you can also specify step counter for the ranges, so that you can get every Nth number or letter:
If you specify URL without protocol:// prefix, curl will attempt to guess what protocol you might want. It will then default to HTTP but try other protocols based on often-used host name prefixes. For example, for host names starting with "ftp." curl will assume you want to speak FTP.
PROGRESS METER
curl normally displays a progress meter during operations, indicating amount of transfered data, transfer speeds and estimated time left etc.However, since curl displays data to the terminal by default, if you invoke curl to do an operation and it is about to write data to the terminal, it disables the progress meter as otherwise it would mess up the output mixing progress meter and response data.
If you want a progress meter for HTTP POST or PUT requests, you need to redirect the response output to a file, using shell redirect (>), -o or similar.
It is not the same case for FTP upload as that operation is not spitting out any response data to the terminal.
If you prefer a progress "bar" instead of the regular meter, -# is your friend.
OPTIONS
-a/--append (FTP) When used in an FTP upload, this will tell curl to append to the target file instead of overwriting it. If the file doesn"t exist, it will be created.If this option is used twice, the second one will disable append mode again.
-A/--user-agent
If this option is set more than once, the last one will be the one that"s used. --anyauth (HTTP) Tells curl to figure out authentication method by itself, and use the most secure one the remote site claims it supports. This is done by first doing a request and checking the response-headers, thus inducing an extra network round-trip. This is used instead of setting a specific authentication method, which you can do with --basic , --digest , --ntlm , and --negotiate .
Note that using --anyauth is not recommended if you do uploads from stdin, since it may require data to be sent twice and then the client must be able to rewind. If the need should arise when uploading from stdin, the upload operation will fail.
If this option is used several times, the following occurrences make no
difference.
-b/--cookie
If no "=" letter is used in the line, it is treated as a filename to use to read previously stored cookie lines from, which should be used in this session if they match. Using this method also activates the "cookie parser" which will make curl record incoming cookies too, which may be handy if you"re using this in combination with the -L/--location option. The file format of the file to read cookies from should be plain HTTP headers or the Netscape/Mozilla cookie file format.
NOTE that the file specified with -b/--cookie is only used as input. No cookies will be stored in the file. To store cookies, use the -c/--cookie-jar option or you could even save the HTTP headers to a file using -D/--dump-header !
If this option is set more than once, the last one will be the one that"s used. -B/--use-ascii Enable ASCII transfer when using FTP or LDAP. For FTP, this can also be enforced by using an URL that ends with ";type=A". This option causes data sent to stdout to be in text mode for win32 systems.
If this option is used twice, the second one will disable ASCII usage. --basic (HTTP) Tells curl to use HTTP Basic authentication. This is the default and this option is usually pointless, unless you use it to override a previously set option that sets a different authentication method (such as --ntlm , --digest and --negotiate ).
If this option is used several times, the following occurrences make no
difference.
--ciphers
(SSL) Specifies which ciphers to use in the connection. The list of ciphers
must be using valid ciphers. Read up on SSL cipher list details on this URL:
http://www.openssl.org/docs/apps/ciphers.html
If this option is used several times, the last one will override the others. --compressed (HTTP) Request a compressed response using one of the algorithms libcurl supports, and return the uncompressed document. If this option is used and the server sends an unsupported encoding, Curl will report an error.
If this option is used several times, each occurrence will toggle it on/off.
--connect-timeout
If this option is used several times, the last one will be used.
-c/--cookie-jar
NOTE If the cookie jar can"t be created or written to, the whole curl operation won"t fail or even report an error clearly. Using -v will get a warning displayed, but that is the only visible feedback you get about this possibly lethal situation.
If this option is used several times, the last specified file name will be
used.
-C/--continue-at
Use "-C -" to tell curl to automatically find out where/how to resume the transfer. It then uses the given output/input files to figure that out.
If this option is used several times, the last one will be used. --create-dirs When used in conjunction with the -o option, curl will create the necessary local directory hierarchy as needed. This option creates the dirs mentioned with the -o option, nothing else. If the -o file name uses no dir or if the dirs it mentions already exist, no dir will be created.
To create remote directories when using FTP, try --ftp-create-dirs . --crlf (FTP) Convert LF to CRLF in upload. Useful for MVS (OS/390).
If this option is used several times, the following occurrences make no difference. -d/--data (HTTP) Sends the specified data in a POST request to the HTTP server, in a way that can emulate as if a user has filled in a HTML form and pressed the submit button. Note that the data is sent exactly as specified with no extra processing (with all newlines cut off). The data is expected to be "url-encoded". This will cause curl to pass the data to the server using the content-type application/x-www-form-urlencoded. Compare to -F/--form . If this option is used more than once on the same command line, the data pieces specified will be merged together with a separating &-letter. Thus, using "-d name=daniel -d skill=lousy" would generate a post chunk that looks like "name=daniel&skill=lousy".
If you start the data with the letter @, the rest should be a file name to read the data from, or - if you want curl to read the data from stdin. The contents of the file must already be url-encoded. Multiple files can also be specified. Posting data from a file named "foobar" would thus be done with --data @foobar".
To post data purely binary, you should instead use the --data-binary option.
-d/--data is the same as --data-ascii .
If this option is used several times, the ones following the first will append data. --data-ascii (HTTP) This is an alias for the -d/--data option.
If this option is used several times, the ones following the first will append data. --data-binary (HTTP) This posts data in a similar manner as --data-ascii does, although when using this option the entire context of the posted data is kept as-is. If you want to post a binary file without the strip-newlines feature of the --data-ascii option, this is for you.
If this option is used several times, the ones following the first will append data. --digest (HTTP) Enables HTTP Digest authentication. This is a authentication that prevents the password from being sent over the wire in clear text. Use this in combination with the normal -u/--user option to set user name and password. See also --ntlm , --negotiate and --anyauth for related options.
If this option is used several times, the following occurrences make no difference. --disable-eprt (FTP) Tell curl to disable the use of the EPRT and LPRT commands when doing active FTP transfers. Curl will normally always first attempt to use EPRT, then LPRT before using PORT, but with this option, it will use PORT right away. EPRT and LPRT are extensions to the original FTP protocol, may not work on all servers but enable more functionality in a better way than the traditional PORT command.
If this option is used several times, each occurrence will toggle this on/off. --disable-epsv (FTP) Tell curl to disable the use of the EPSV command when doing passive FTP transfers. Curl will normally always first attempt to use EPSV before PASV, but with this option, it will not try using EPSV.
If this option is used several times, each occurrence will toggle this on/off.
-D/--dump-header
This option is handy to use when you want to store the headers that a HTTP site sends to you. Cookies from the headers could then be read in a second curl invoke by using the -b/--cookie option! The -c/--cookie-jar option is however a better way to store cookies.
When used on FTP, the ftp server response lines are considered being "headers" and thus are saved there.
If this option is used several times, the last one will be used.
-e/--referer
If this option is used several times, the last one will be used.
--engine
If this option is used several times, each occurrence will toggle this on/off.
--egd-file
If this option is used several times, the last one will be used.
--cert-type
If this option is used several times, the last one will be used.
--cacert
curl recognizes the environment variable named "CURL_CA_BUNDLE" if that is set, and uses the given path as a path to a CA cert bundle. This option overrides that variable.
The windows version of curl will automatically look for a CA certs file named "curl-ca-bundle.crt", either in the same directory as curl.exe, or in the Current Working Directory, or in any folder along your PATH.
If this option is used several times, the last one will be used.
--capath
If this option is used several times, the last one will be used. -f/--fail (HTTP) Fail silently (no output at all) on server errors. This is mostly done like this to better enable scripts etc to better deal with failed attempts. In normal cases when a HTTP server fails to deliver a document, it returns an HTML document stating so (which often also describes why and more). This flag will prevent curl from outputting that and return error 22.
If this option is used twice, the second will again disable silent failure. --ftp-account (FTP) When an FTP server asks for "account data" after user name and password has been provided, this data is sent off using the ACCT command. (Added in 7.13.0)
If this option is used twice, the second will override the previous use. --ftp-create-dirs (FTP) When an FTP URL/operation uses a path that doesn"t currently exist on the server, the standard behavior of curl is to fail. Using this option, curl will instead attempt to create missing directories.
If this option is used twice, the second will again disable directory creation. --ftp-method (FTP) Control what method curl should use to reach a file on a FTP(S) server. The method argument should be one of the following alternatives: multicwd curl does a single CWD operation for each path part in the given URL. For deep hierarchies this means very many commands. This is how RFC1738 says it should be done. This is the default but the slowest behavior. nocwd curl does no CWD at all. curl will do SIZE, RETR, STOR etc and give a full path to the server for all these commands. This is the fastest behavior. singlecwd curl does one CWD with the full target directory and then operates on the file "normally" (like in the multicwd case). This is somewhat more standards compliant than "nocwd" but without the full penalty of "multicwd". --ftp-pasv (FTP) Use PASV when transferring. PASV is the internal default behavior, but using this option can be used to override a previous --ftp-port option. (Added in 7.11.0)
If this option is used several times, the following occurrences make no difference.
Ftp-alternative-to-user
This option has no effect if PORT, EPRT or EPSV is used instead of PASV.
If this option is used twice, the second will again use the server"s suggested address. --ftp-ssl (FTP) Try to use SSL/TLS for the FTP connection. Reverts to a non-secure connection if the server doesn"t support SSL/TLS. (Added in 7.11.0)
If this option is used twice, the second will again disable this. --ftp-ssl-reqd (FTP) Require SSL/TLS for the FTP connection. Terminates the connection if the server doesn"t support SSL/TLS. (Added in 7.15.5)
If this option is used twice, the second will again disable this.
-F/--form
Example, to send your password file to the server, where "password" is the name of the form-field to which /etc/passwd will be the input:
To read the file"s content from stdin instead of a file, use - where the file name should"ve been. This goes for both @ and < constructs.
You can also tell curl what Content-Type to use by using "type=", in a manner similar to:
curl -F "[email protected];type=text/html" url.com
curl -F "name=daniel;type=text/foo" url.com
You can also explicitly change the name field of an file upload part by setting filename=, like this:
curl -F "file=@localfile;filename=nameinpost" url.com
See further examples and details in the MANUAL.
This option can be used multiple times.
--form-string
If used in combination with -I, the POST data will instead be appended to the URL with a HEAD request.
If this option is used several times, the following occurrences make no
difference.
-h/--help
Usage help.
-H/--header
curl will make sure that each header you add/replace get sent with the proper end of line marker, you should thus not add that as a part of the header content: do not add newlines or carriage returns they will only mess things up for you.
See also the -A/--user-agent and -e/--referer options.
This option can be used multiple times to add/replace/remove multiple headers. --ignore-content-length (HTTP) Ignore the Content-Length header. This is particularly useful for servers running Apache 1.x, which will report incorrect Content-Length for files larger than 2 gigabytes. -i/--include (HTTP) Include the HTTP-header in the output. The HTTP-header includes things like server-name, date of the document, HTTP-version and more...
If this option is used twice, the second will again disable header include.
--interface
If this option is used several times, the last one will be used. -I/--head (HTTP/FTP/FILE) Fetch the HTTP-header only! HTTP-servers feature the command HEAD which this uses to get nothing but the header of a document. When used on a FTP or FILE file, curl displays the file size and last modification time only.
If this option is used twice, the second will again disable header only. -j/--junk-session-cookies (HTTP) When curl is told to read cookies from a given file, this option will make it discard all "session cookies". This will basically have the same effect as if a new session is started. Typical browsers always discard session cookies when they"re closed down.
If this option is used several times, each occurrence will toggle this on/off. -k/--insecure (SSL) This option explicitly allows curl to perform "insecure" SSL connections and transfers. All SSL connections are attempted to be made secure by using the CA certificate bundle installed by default. This makes all connections considered "insecure" to fail unless -k/--insecure is used.
If this option is used twice, the second time will again disable it.
--key
If this option is used several times, the last one will be used.
--key-type
If this option is used several times, the last one will be used.
--krb4
This option requires that the library was built with kerberos4 support. This is not very common. Use -V/--version to see if your curl supports it.
If this option is used several times, the last one will be used.
-K/--config
Specify the filename as "-" to make curl read the file from stdin.
Note that to be able to specify a URL in the config file, you need to specify it using the --url option, and not by simply writing the URL on its own line. So, it could look similar to this:
This option can be used multiple times.
When curl is invoked, it always (unless -q is used) checks for a default config file and uses it if found. The default config file is checked for in the following places in this order:
1) curl tries to find the "home dir": It first checks for the CURL_HOME and then the HOME environment variables. Failing that, it uses getpwuid() on unix-like systems (which returns the home dir given the current user in your system). On Windows, it then checks for the APPDATA variable, or as a last resort the "%USERPROFILE%Application Data".
2) On windows, if there is no _curlrc file in the home dir, it checks for one
in the same dir the executable curl is placed. On unix-like systems, it will
simply try to load .curlrc from the determined home dir.
--limit-rate
The given speed is measured in bytes/second, unless a suffix is appended. Appending "k" or "K" will count the number as kilobytes, "m" or M" makes it megabytes while "g" or "G" makes it gigabytes. Examples: 200K, 3m and 1G.
If you are also using the -Y/--speed-limit option, that option will take precedence and might cripple the rate-limiting slightly, to help keeping the speed-limit logic working.
If this option is used several times, the last one will be used. -l/--list-only (FTP) When listing an FTP directory, this switch forces a name-only view. Especially useful if you want to machine-parse the contents of an FTP directory since the normal directory view doesn"t use a standard look or format.
This option causes an FTP NLST command to be sent. Some FTP servers list only files in their response to NLST; they do not include subdirectories and symbolic links.
If this option is used twice, the second will again disable list only.
--local-port
If this option is used twice, the second will again disable location following. --location-trusted (HTTP/HTTPS) Like -L/--location , but will allow sending the name + password to all hosts that the site may redirect to. This may or may not introduce a security breach if the site redirects you do a site to which you"ll send your authentication info (which is plaintext in the case of HTTP Basic authentication).
If this option is used twice, the second will again disable location following.
--max-filesize
NOTE: The file size is not always known prior to download, and for such files
this option has no effect even if the file transfer ends up being larger than
this given limit. This concerns both FTP and HTTP transfers.
-m/--max-time
If this option is used several times, the last one will be used. -M/--manual Manual. Display the huge help text. -n/--netrc Makes curl scan the .netrc file in the user"s home directory for login name and password. This is typically used for ftp on unix. If used with http, curl will enable user authentication. See (4) or (1) for details on the file format. Curl will not complain if that file hasn"t the right permissions (it should not be world nor group readable). The environment variable "HOME" is used to find the home directory.
A quick and very simple example of how to setup a .netrc to allow curl to ftp to the machine host.domain.com with user name "myself" and password "secret" should look similar to:
machine host.domain.com login myself password secret
If this option is used twice, the second will again disable netrc usage. --netrc-optional Very similar to --netrc , but this option makes the .netrc usage optional and not mandatory as the --netrc does. --negotiate (HTTP) Enables GSS-Negotiate authentication. The GSS-Negotiate method was designed by Microsoft and is used in their web applications. It is primarily meant as a support for Kerberos5 authentication but may be also used along with another authentication methods. For more information see IETF draft draft-brezak-spnego-http-04.txt.
This option requires that the library was built with GSSAPI support. This is not very common. Use -V/--version to see if your version supports GSS-Negotiate.
When using this option, you must also provide a fake -u/--user option to activate the authentication code properly. Sending a "-u:" is enough as the user name and password from the -u option aren"t actually used.
If this option is used several times, the following occurrences make no difference. -N/--no-buffer Disables the buffering of the output stream. In normal work situations, curl will use a standard buffered output stream that will have the effect that it will output the data in chunks, not necessarily exactly when the data arrives. Using this option will disable that buffering.
If this option is used twice, the second will again switch on buffering. --ntlm (HTTP) Enables NTLM authentication. The NTLM authentication method was designed by Microsoft and is used by IIS web servers. It is a proprietary protocol, reversed engineered by clever people and implemented in curl based on their efforts. This kind of behavior should not be endorsed, you should encourage everyone who uses NTLM to switch to a public and documented authentication method instead. Such as Digest.
If you want to enable NTLM for your proxy authentication, then use --proxy-ntlm .
This option requires that the library was built with SSL support. Use -V/--version to see if your curl supports NTLM.
If this option is used several times, the following occurrences make no
difference.
-o/--output
You may use this option as many times as you have number of URLs.
See also the --create-dirs option to create the local directories dynamically. -O/--remote-name Write output to a local file named like the remote file we get. (Only the file part of the remote file is used, the path is cut off.)
The remote file name to use for saving is extracted from the given URL, nothing else.
You may use this option as many times as you have number of URLs.
--pass
If this option is used several times, the last one will be used. --proxy-anyauth Tells curl to pick a suitable authentication method when communicating with the given proxy. This will cause an extra request/response round-trip. (Added in 7.13.2)
If this option is used twice, the second will again disable the proxy use-any authentication. --proxy-basic Tells curl to use HTTP Basic authentication when communicating with the given proxy. Use --basic for enabling HTTP Basic with a remote host. Basic is the default authentication method curl uses with proxies.
If this option is used twice, the second will again disable proxy HTTP Basic authentication. --proxy-digest Tells curl to use HTTP Digest authentication when communicating with the given proxy. Use --digest for enabling HTTP Digest with a remote host.
If this option is used twice, the second will again disable proxy HTTP Digest. --proxy-ntlm Tells curl to use HTTP NTLM authentication when communicating with the given proxy. Use --ntlm for enabling NTLM with a remote host.
If this option is used twice, the second will again disable proxy HTTP NTLM. -p/--proxytunnel When an HTTP proxy is used (-x/--proxy ), this option will cause non-HTTP protocols to attempt to tunnel through the proxy instead of merely using it to do HTTP-like operations. The tunnel approach is made with the HTTP proxy CONNECT request and requires that the proxy allows direct connect to the remote port number curl wants to tunnel through to.
If this option is used twice, the second will again disable proxy tunnel. -P/--ftp-port
(FTP) Reverses the initiator/listener roles when connecting with ftp. This switch makes Curl use the PORT command instead of PASV. In practice, PORT tells the server to connect to the client"s specified address and port, while PASV asks the server for an ip address and port to connect to. should be one of: interface i.e "eth0" to specify which interface"s IP address you want to use (Unix only) IP address i.e "192.168.10.1" to specify exact IP number host name i.e "my.host.domain" to specify machine - make curl pick the same IP address that is already used for the control connectionIf this option is used several times, the last one will be used. Disable the
use of PORT with --ftp-pasv
. Disable the attempt to use the EPRT command
instead of PORT by using --disable-eprt
. EPRT is really PORT++.
-q
If used as the first parameter on the command line, the curlrc
config
file will not be read and used. See the -K/--config
for details on the
default config file search path.
-Q/--quote
This option can be used multiple times.
--random-file
(*) = NOTE that this will cause the server to reply with a multipart response!
You should also be aware that many HTTP/1.1 servers do not have this feature enabled, so that when you attempt to get a range, you"ll instead get the whole document.
FTP range downloads only support the simple syntax "start-stop" (optionally with one of the numbers omitted). It depends on the non-RFC command SIZE.
If this option is used several times, the last one will be used. -R/--remote-time When used, this will make libcurl attempt to figure out the timestamp of the remote file, and if that is available make the local file get that same timestamp.
If this option is used twice, the second time disables this again.
--retry
When curl is about to retry a transfer, it will first wait one second and then for all forthcoming retries it will double the waiting time until it reaches 10 minutes which then will be the delay between the rest of the retries. By using --retry-delay you disable this exponential backoff algorithm. See also --retry-max-time to limit the total time allowed for retries. (Added in 7.12.3)
If this option is used multiple times, the last occurrence decide the amount.
--retry-delay
If this option is used multiple times, the last occurrence decide the amount.
--retry-max-time
If this option is used multiple times, the last occurrence decide the amount. -s/--silent Silent mode. Don"t show progress meter or error messages. Makes Curl mute.
If this option is used twice, the second will again disable silent mode. -S/--show-error When used with -s it makes curl show error message if it fails.
If this option is used twice, the second will again disable show error.
--socks4
-x/--proxy
If this option is used several times, the last one will be used.
--socks5
This option overrides any previous use of -x/--proxy , as they are mutually exclusive.
If this option is used several times, the last one will be used. (This option
was previously wrongly documented and used as --socks without the number
appended.)
--stderr
If this option is used several times, the last one will be used. --tcp-nodelay Turn on the TCP_NODELAY option. See the (3) man page for details about this option. (Added in 7.11.2)
If this option is used several times, each occurrence toggles this on/off.
-t/--telnet-option
TTYPE=
XDISPLOC=
NEW_ENV=
Use the file name "-" (a single dash) to use stdin instead of a given file.
You can specify one -T for each URL on the command line. Each -T + URL pair specifies what to upload and to where. curl also supports "globbing" of the -T argument, meaning that you can upload multiple files to a single URL by using the same URL globbing style supported in the URL, like this:
FILES
~/.curlrc Default config file, see -K/--config for details.ENVIRONMENT
http_proxyEXIT CODES
There exists a bunch of different error codes and their corresponding error messages that may appear during bad conditions. At the time of this writing, the exit codes are: 1 Unsupported protocol. This build of curl has no support for this protocol. 2 Failed to initialize. 3 URL malformat. The syntax was not correct. 4 URL user malformatted. The user-part of the URL syntax was not correct. 5 Couldn"t resolve proxy. The given proxy host could not be resolved. 6 Couldn"t resolve host. The given remote host was not resolved. 7 Failed to connect to host. 8 FTP weird server reply. The server sent data curl couldn"t parse. 9 FTP access denied. The server denied login or denied access to the particular resource or directory you wanted to reach. Most often you tried to change to a directory that doesn"t exist on the server. 10 FTP user/password incorrect. Either one or both were not accepted by the server. 11 FTP weird PASS reply. Curl couldn"t parse the reply sent to the PASS request. 12 FTP weird USER reply. Curl couldn"t parse the reply sent to the USER request. 13 FTP weird PASV reply, Curl couldn"t parse the reply sent to the PASV request. 14 FTP weird 227 format. Curl couldn"t parse the 227-line the server sent. 15 FTP can"t get host. Couldn"t resolve the host IP we got in the 227-line. 16 FTP can"t reconnect. Couldn"t connect to the host we got in the 227-line. 17 FTP couldn"t set binary. Couldn"t change transfer method to binary. 18 Partial file. Only a part of the file was transferred. 19 FTP couldn"t download/access the given file, the RETR (or similar) command failed. 20 FTP write error. The transfer was reported bad by the server. 21 FTP quote error. A quote command returned error from the server. 22 HTTP page not retrieved. The requested url was not found or returned another error with the HTTP error code being 400 or above. This return code only appears if -f/--fail is used. 23 Write error. Curl couldn"t write data to a local filesystem or similar. 24 Malformed user. User name badly specified. 25 FTP couldn"t STOR file. The server denied the STOR operation, used for FTP uploading. 26 Read error. Various reading problems. 27 Out of memory. A memory allocation request failed. 28 Operation timeout. The specified time-out period was reached according to the conditions. 29 FTP couldn"t set ASCII. The server returned an unknown reply. 30 FTP PORT failed. The PORT command failed. Not all FTP servers support the PORT command, try doing a transfer using PASV instead! 31 FTP couldn"t use REST. The REST command failed. This command is used for resumed FTP transfers. 32 FTP couldn"t use SIZE. The SIZE command failed. The command is an extension to the original FTP spec RFC 959. 33 HTTP range error. The range "command" didn"t work. 34 HTTP post error. Internal post-request generation error. 35 SSL connect error. The SSL handshaking failed. 36 FTP bad download resume. Couldn"t continue an earlier aborted download. 37 FILE couldn"t read file. Failed to open the file. Permissions? 38 LDAP cannot bind. LDAP bind operation failed. 39 LDAP search failed. 40 Library not found. The LDAP library was not found. 41 Function not found. A required LDAP function was not found. 42 Aborted by callback. An application told curl to abort the operation. 43 Internal error. A function was called with a bad parameter. 44 Internal error. A function was called in a bad order. 45 Interface error. A specified outgoing interface could not be used. 46 Bad password entered. An error was signaled when the password was entered. 47 Too many redirects. When following redirects, curl hit the maximum amount. 48 Unknown TELNET option specified. 49 Malformed telnet option. 51 The remote peer"s SSL certificate wasn"t ok 52 The server didn"t reply anything, which here is considered an error. 53 SSL crypto engine not found 54 Cannot set SSL crypto engine as default 55 Failed sending network data 56 Failure in receiving network data 57 Share is in use (internal error) 58 Problem with the local certificate 59 Couldn"t use specified SSL cipher 60 Problem with the CA cert (path? permission?) 61 Unrecognized transfer encoding 62 Invalid LDAP URL 63 Maximum file size exceeded 64 Requested FTP SSL level failed 65 Sending the data requires a rewind that failed 66 Failed to initialise SSL Engine 67 User, password or similar was not accepted and curl failed to login 68 File not found on TFTP server 69 Permission problem on TFTP server 70 Out of disk space on TFTP server 71 Illegal TFTP operation 72 Unknown TFTP transfer ID 73 File already exists (TFTP) 74 No such user (TFTP) 75 Character conversion failed 76 Character conversion functions required XX There will appear more error codes here in future releases. The existing ones are meant to never change.16.02.2006 Джеф Феллинг
Curl поможет управлять данными, размещенными в Web В данной статье рассматривается бесплатный инструмент Curl, с помощью которого можно передавать и принимать Web-страницы из командной строки. Благодаря Curl легко автоматизировать многие
Curl поможет управлять данными, размещенными в Web
В данной статье рассматривается бесплатный инструмент Curl, с помощью которого можно передавать и принимать Web-страницы из командной строки. Благодаря Curl легко автоматизировать многие операции информационной защиты и администрирования, например извлечь Web-страницу для анализа или загрузить исправление для системы безопасности из Web.
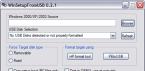
Установка Curl
Curl входит в состав многих дистрибутивов Unix. Имеются двоичные файлы и исходные тексты для большинства других операционных систем. Даже программисты, работающие с открытым PHP, могут использовать Curl для безопасного доступа к Web-контенту непосредственно из PHP-сценариев.
Для работы Curl с Web-узлами Secure Sockets Layer (SSL) необходим пакет OpenSSL. Существуют две версии Curl: одна с SSL, другая без SSL. Рекомендую первую, поскольку SSL надежно защищает данные.
Прежде чем использовать Curl с функциями SSL, необходимо загрузить из сети и отдельно установить пакет OpenSSL. Двоичные файлы OpenSSL for Windows можно загрузить с сайта проекта GnuWin32 SourceForge по адресу . На этом сайте имеется и много других полезных инструментов, портированных в Windows.
Следует загрузить и установить пакет OpenSSL, затем скопировать два DLL-файла в каталог system32:
Copy "C:Program FilesGnuWin32 binlibeay32.dll" %windir%system32 copy "C:Program FilesGnuWin32 binlibssl32.dll" %windir%system32
После этого можно установить Curl. SSL-совместимые двоичные файлы Curl для Windows можно найти по адресу http://curl.haxx.se/latest.cgi?curl=win32-ssl-sspi . Новейшая версия, curl 7.15.0, находится в win32-ssl-sspi.zip, который содержит файл curl.exe и документацию.
После установки Curl следует убедиться в его работоспособности, введя команду
Curl http://isc.sans.org/ infocon.txt
Если на экране появится слово, обозначающее цвет (например, green), значит, Curl работает. В этом простом примере Curl извлекает содержание Infocon из Web-узла Internet Storm Center института SANS. Green означает, что Internet функционирует нормально и серьезных угроз не обнаружено. Если же вместо green на экране появляются слова yellow, orange или red, то отложите эту статью и посетите сайт http://isc.sans.org , чтобы узнать о состояниях повышенной опасности в Internet. В случае ошибки необходимо проверить правильность установки Curl.
В сущности, Curl извлекает Web-страницу, а затем выдает исходный текст HTML страницы на консоль. Однако возможности утилиты шире. Curl располагает встроенной функцией проверки ошибок. Например, команда
Curl http://noserverhere
выдает ошибку Curl: (6) Could not resolve host: noserverhere; Host not found. Коды ошибок можно использовать в сценариях, чтобы проверить доступность Web-страницы или реакцию Web-сервера. Например, если использовать Curl для ежедневного извлечения Web-страницы, в частности суточной статистики Web-узла, можно дополнить сценарий исходным текстом, отыскивающим коды ошибок. Если Curl выдает код ошибки Curl: (7) couldn?t connect to host, то можно немедленно передать предупреждение или отправить сообщение по электронной почте.
Извлечение шифрованных данных
Одно из важнейших достоинств Curl - совместимость с SSL. Запрошенные страницы HTTPS передаются через сеть в зашифрованном виде, а затем Curl выводит на экран восстановленный текст. Кроме того, Curl проверяет сертификаты - дату завершения действия сертификата, соответствие имени хост-компьютера хост-имени в сертификате и уровень доверия к корневому сертификату - и предупреждает, если сертификат некорректен. Параметр -cacert позволяет указать определенный файл сертификата. Проверка сертификатов отменяется с помощью параметра -k. Альтернативный подход - использовать параметр -insecure.
Не только для WWW
Возможности Curl шире простой пересылки файлов через Internet. С помощью Curl можно быстро получить список каталогов FTP-сайта:
Curl ftp://myftpsite
Чтобы увидеть подкаталоги сайта, следует ввести команду
Curl ftp://myftpsite/subdir/
Для загрузки файла из сети достаточно указать в URL имя файла. В следующем примере файл с именем readme.txt загружается прямо из командной строки и отображается на экране:
Curl ftp://ftp.microsoft.com/ deskapps/games/readme.txt
Нередко проще подготовить сценарий с Curl для ввода FTP-файлов, чем использовать команду FTP интерактивно.
По умолчанию данные выводятся непосредственно на консоль, но их можно перенаправить в файл с помощью параметров -o и -O. Чтобы получить страницу и сохранить ее на диске, следует указать параметр -o. Параметр -O сохраняет полученную страницу в локальном файле, и Curl извлекает имя удаленного документа. Если в URL имя файла не указано, то эта операция закончится неудачей. Если использовать Curl для передачи на Web-узел запроса без имени файла, но нужно сохранить результат в файле, можно указать имя файла в командной строке, например:
Аутентификация
Curl обеспечивает методы аутентификации Basic, Digest и интегрированный. На большинстве сайтов доступ к страницам с аутентификацией на базе форм можно получить с использованием функций отправки Curl, что будет продемонстрировано чуть ниже. Это значит, что можно передать данные формы, в частности имя пользователя и пароль, на удаленный Web-узел, на Web-странице которого выводится запрос на ввод информации. Для пересылки учетных данных можно использовать параметр -u или вставить их в URL, что традиционно делается в FTP, например:
Curl ftp://username: password@myhtmlsite
С помощью Curl приемы, заимствованные из FTP, можно перенести в HTTP, как в следующем примере:
Curl http://username:password @myhtmlsite/default.htm
Curl также обеспечивает доступ к Web-страницам через proxy-сервер. Поэтому Curl можно настроить на использование proxy-сервера для аутентификации в режимах Basic, Digest и NTLM.
Читайте документацию
В одной статье трудно охватить все многочисленные функции Curl, среди которых и загрузка файлов на сервер (-T), и просмотр только информации в заголовке HTTP (-I), и просмотр всех данных в детальном режиме (-V), и скрытый вывод (-s). Я рекомендую более подробно ознакомиться с функциями Curl в руководстве, опубликованном по адресу http://curl.haxx.se/docs .
Пример использования Curl
Ознакомившись с основами Curl, рассмотрим простой пример извлечения данных из Web-узла при заданных входных данных. Построим простой инструмент Whois, который демонстрирует простоту и удобство применения Curl и процедуру отправки данных на Web-узел с использованием параметра -d. В данном примере Curl посылает IP-адрес на Web-узел Arin Whois, а затем извлекает результаты из этого сайта. Whois отыскивает информацию о владельце IP-адреса.
Перед началом работы важно исследовать Web-узел, так как в исходном тексте каждого сайта есть свои особенности, и Curl не всегда одинаково работает с любыми сайтами. Предварительное посещение сайта позволяет собрать необходимую информацию для работы Curl. В данном примере я воспользовался браузером, чтобы посетить Web-узел http://www.arin.net/whois/ , и обратил внимание, что на сайте имеется единственное поле ввода данных, в котором посетители указывают интересующий их IP-адрес. Необходимо получить детали этого поля, которое представляет собой часть Web-формы. В данном примере используется Perl-сценарий formfind.pl (http://cool.haxx.se/cvs.cgi/curl/perl/contrib/ formfind?rev=HEAD&content-type=text/vnd.viewcvs-markup ). Сценарий Formfind.pl преобразует данные формы в удобные выходные результаты и упрощает ручной поиск данных в HTML. Конечно, для запуска Formfind на компьютере должен быть развернут Perl. Хороший пакет Win32 Perl можно заказать на сайте ActiveState ActivePerl по адресу http://www.activestate.com .
Рассмотрим пример более подробно. Во-первых, обратимся к Web-узлу, содержащему форму, которая запрашивает информацию:
Curl -o whoisOutputFile http://www.arin.net/whois/
Эта команда извлекает страницу Whois из http://www.arin.net и сохраняет ее в текстовом файле whoisOutputFile, который содержит исходный текст HTML, воспроизводимый браузером при посещении сайта.
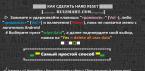
Затем необходимо найти и выделить данные формы:
./formfind.pl
Formfind выдает переменные формы и их возможные величины. В данном примере выходные результаты имеют довольно простой вид (см. экран 1 ).
Следует обратить внимание на данные формы Input с именем queryinput. Это текстовое поле, в которое Curl должен послать искомый IP-адрес. Конкретный IP-адрес не имеет значения - в данном примере использовался адрес Microsoft. С помощью параметра -d искомый IP-адрес пересылается в поле queryinput:
Curl -d "queryinput= 207.46.133.140" http://ws.arin.net/cgibin/ whois.pl
Команда Curl с параметром -d отыскивает данные в форме, в данном случае queryinput, которые представляют собой искомый IP-адрес. При этом меняется целевой адрес; форма должна передавать данные на новый URL, который представляет сценарий whois.pl. Новый целевой адрес можно увидеть на выходе formfind на экране 1.
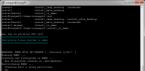
В данном примере также получен исходный текст HTML ответа Whois, но он скрыт группой тэгов HTML. По умолчанию сообщение о статусе Curl показывает размер документа, процент выполнения и скорость пересылки. Выходные данные можно немного расчистить и отфильтровать имя организации, которой принадлежит IP-адрес. Статус Curl можно блокировать с помощью параметра -s. Команду следует выполнять через grep, чтобы получить только OrgName:
Curl -s -d "queryinput= 207.46.133.140" http://ws.arin.net/cgibin/ whois.pl | grep OrgName
В данном примере выходные результаты показывают, что OrgName - Microsoft Corp.
@echo off curl -k -s -d "queryinput= %1" http://ws.arin.net/cgibin/ whois.pl | grep OrgName